
Before I attempted this, I searched and searched and didn't see anything on this forum (I don't recall much on the other Lamba forums either) whereby someone disassembled one of the side view mirrors to repair the power folding function. I know that there are plenty of people in the same boat I was (one or both not folding any more), so I figured I'd go ahead and write a good how to. Honestly, I'm a pretty capable mechanic (my works often exceeds what most dealership mechanics do) and I'd write up more how-to guides, if I only had the time.
In my case, my driver side mirror works fine, but the passenger side stopped folding- all other functions worked fine. I also got REALLY lucky in that I found a person on eBay selling a brand new, GM factory passenger side folding heated power mirror (unpainted) for $40. If you are like me, you didn't want to pay to buy a mirror and then pay even more to have it painted and/or you have a "donor" mirror with which you can swap parts.
First, here's a few notes/tips to keep in mind:
- From what I saw, you can separate and replace the following parts of the mirror: The shell/housing (the painted part that holds all the guts), the turn signal indicator, the mirror motor assembly, possibly the wiring harness (might take a little work to get it out of the non-folding part of the mirror assembly), the mirror/glass, and (naturally) the folding motor assembly.
- If the part of the mirror assembly that does not fold is fine, you COULD actually replace the mirror folding mechanism without removing it from the vehicle. Since I had a brand new mirror as my "donor", I opted to replace the whole thing
Let's start! I only took photos of the mirror when I was swapping the motors as that's the focus of this write up (sorry)
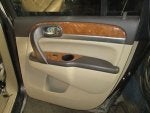
1. If you are going to replace the non-folding part, take the whole mirror off the car. Start by prying loose the door panel at the upper left corner (near where the mirror is on the door). At least for the passenger door, you will need to take out 3 bolts to get it pried out enough to get to the 2 wiring harnesses. One is behind a plastic cover that sits behind the interior door handle and the other two are located under a removable plastic cover that runs vertically up the grab handle on the door panel (see attached pic). You will also need to remove the interior plastic cover that hides the 3 nuts that hold the mirror to the door (it's held on by a spring clip- just carefully pry away from the door to pop it loose).
2. Disconnect the wiring harnesses and pop out the wiring harness retainer that is attached to the metal under the door panel, just above where the harness connects.
3. NOTE: There are 2 plastic retainers on the inside of the door rubber that hold the door rubber to the mirror assembly (if you are looking at the 3 mounting nuts for the mirror on the inside, the clips will be to the left on the door's rubber surround). Make sure you pop these out before trying to remove the mirror assembly
4. Remove all 3 mounting nuts (10mm) and remove the mirror from the vehicle.
Okay- time to disassemble!
1. Start by pushing the top of the mirror glass all the way in, so that the bottom of the glass is sticking out (i.e. if it were on the car and you were looking in your mirror, all you'd see is the sky.
2. CAREFULLY pry the mirror outward and while holding pressure, use a hook or other similar tools to try to release some of the tabs that hold the back of the mirror to the motor assembly. I know it feels like your gonna break something, but keep applying careful pressure and eventually the mirror will release.
3. Once the mirror releases STOP- more than likely you have a heated mirror and there are two wires attached to the top left corner of the glass that need to be taken off before you can separate the glass from the mirror housing. NOTE: when pulling off the heater wires, I recommend using the dull edge of a tool (any tool) to apply pressure to the metal terminals where they attach to the mirror. The first time I went to pull off a heater wire, it felt like I was about to tear the whole metal terminal off the mirror. By holding the other part of the metal terminal against the glass while pulling on the wire to remove it, you keep the metal terminal from trying to rip off the back of the mirror.
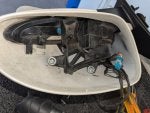
4. Once the glass is out of the way, you'll see that everything is pretty accessible!
5. Disconnect the wire harnesses going to the mirror tilt motor and turn signal (for now, you can leave the one attached to the folding motor assembly). Pull the turn signal harness out from behind the tilt motor so that all wires are together near folding motor assembly.
6. Remove the two screws that hold the folding motor assembly to the shell (torx)- they are long screws and are easy to remove (see attached pic).
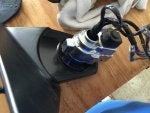
7. Now for the tricky part- the folding motor assembly is somewhat tightly fitted into the shell. To separate the shell from the folding motor, separate the two parts (the shell and the part that mounts to the vehicle) by prying apart with a wiggle/rocking motion. You should slowly feel the shell sliding off the folding motor assembly.
NOTE: The shape of the folding motor assembly prevents the shell from sliding straight off the top. Once the shell has slid as far as it can off the folding motor assembly, carefully tilt the shell away from the assembly at the point closest to the pivot (see attached pic where it shows them partially separated).
8. Finish separating the shell from the folding motor assembly, taking care to route the wiring harness safely out of the shell
9. All you are left with is the mirror mount, folding motor and wiring harness.
At this point, you have a few options:
-If you are replacing/swapping the whole mirror mount, folding motor and wiring harness (which is what I did), simply reverse the steps above to mount the new mount/motor/harness to your existing body color, painted shell.
-If you want to replace just the motor, it's as easy as removing the 4 torx screws holding the folding motor assembly to the mirror mount, pulling off the old folding motor assembly (carefully routing the wire harness out the center hole) and mounting the new folding motor assembly on your existing mirror mount. Then reverse the step above the mount your existing shell onto the new folding motor assembly.
That's about it! In the future, I might try to do these in a PDF since it makes doing inline pics and markup (arrows, circles, etc.) easier. In fact, don't be surprised if I do just that and post it below... :thumb:
Total time (for me at least) was about 1 hour (I'm a detail oriented person, so speed isn't my strong suit). Mechanical knowledge needed was pretty average and basic hand tools and a socket set was all that was needed.
Enjoy!
In my case, my driver side mirror works fine, but the passenger side stopped folding- all other functions worked fine. I also got REALLY lucky in that I found a person on eBay selling a brand new, GM factory passenger side folding heated power mirror (unpainted) for $40. If you are like me, you didn't want to pay to buy a mirror and then pay even more to have it painted and/or you have a "donor" mirror with which you can swap parts.
First, here's a few notes/tips to keep in mind:
- From what I saw, you can separate and replace the following parts of the mirror: The shell/housing (the painted part that holds all the guts), the turn signal indicator, the mirror motor assembly, possibly the wiring harness (might take a little work to get it out of the non-folding part of the mirror assembly), the mirror/glass, and (naturally) the folding motor assembly.
- If the part of the mirror assembly that does not fold is fine, you COULD actually replace the mirror folding mechanism without removing it from the vehicle. Since I had a brand new mirror as my "donor", I opted to replace the whole thing
Let's start! I only took photos of the mirror when I was swapping the motors as that's the focus of this write up (sorry)
1. If you are going to replace the non-folding part, take the whole mirror off the car. Start by prying loose the door panel at the upper left corner (near where the mirror is on the door). At least for the passenger door, you will need to take out 3 bolts to get it pried out enough to get to the 2 wiring harnesses. One is behind a plastic cover that sits behind the interior door handle and the other two are located under a removable plastic cover that runs vertically up the grab handle on the door panel (see attached pic). You will also need to remove the interior plastic cover that hides the 3 nuts that hold the mirror to the door (it's held on by a spring clip- just carefully pry away from the door to pop it loose).
2. Disconnect the wiring harnesses and pop out the wiring harness retainer that is attached to the metal under the door panel, just above where the harness connects.
3. NOTE: There are 2 plastic retainers on the inside of the door rubber that hold the door rubber to the mirror assembly (if you are looking at the 3 mounting nuts for the mirror on the inside, the clips will be to the left on the door's rubber surround). Make sure you pop these out before trying to remove the mirror assembly
4. Remove all 3 mounting nuts (10mm) and remove the mirror from the vehicle.
Okay- time to disassemble!
1. Start by pushing the top of the mirror glass all the way in, so that the bottom of the glass is sticking out (i.e. if it were on the car and you were looking in your mirror, all you'd see is the sky.
2. CAREFULLY pry the mirror outward and while holding pressure, use a hook or other similar tools to try to release some of the tabs that hold the back of the mirror to the motor assembly. I know it feels like your gonna break something, but keep applying careful pressure and eventually the mirror will release.
3. Once the mirror releases STOP- more than likely you have a heated mirror and there are two wires attached to the top left corner of the glass that need to be taken off before you can separate the glass from the mirror housing. NOTE: when pulling off the heater wires, I recommend using the dull edge of a tool (any tool) to apply pressure to the metal terminals where they attach to the mirror. The first time I went to pull off a heater wire, it felt like I was about to tear the whole metal terminal off the mirror. By holding the other part of the metal terminal against the glass while pulling on the wire to remove it, you keep the metal terminal from trying to rip off the back of the mirror.
4. Once the glass is out of the way, you'll see that everything is pretty accessible!
5. Disconnect the wire harnesses going to the mirror tilt motor and turn signal (for now, you can leave the one attached to the folding motor assembly). Pull the turn signal harness out from behind the tilt motor so that all wires are together near folding motor assembly.
6. Remove the two screws that hold the folding motor assembly to the shell (torx)- they are long screws and are easy to remove (see attached pic).
7. Now for the tricky part- the folding motor assembly is somewhat tightly fitted into the shell. To separate the shell from the folding motor, separate the two parts (the shell and the part that mounts to the vehicle) by prying apart with a wiggle/rocking motion. You should slowly feel the shell sliding off the folding motor assembly.
NOTE: The shape of the folding motor assembly prevents the shell from sliding straight off the top. Once the shell has slid as far as it can off the folding motor assembly, carefully tilt the shell away from the assembly at the point closest to the pivot (see attached pic where it shows them partially separated).
8. Finish separating the shell from the folding motor assembly, taking care to route the wiring harness safely out of the shell
9. All you are left with is the mirror mount, folding motor and wiring harness.
At this point, you have a few options:
-If you are replacing/swapping the whole mirror mount, folding motor and wiring harness (which is what I did), simply reverse the steps above to mount the new mount/motor/harness to your existing body color, painted shell.
-If you want to replace just the motor, it's as easy as removing the 4 torx screws holding the folding motor assembly to the mirror mount, pulling off the old folding motor assembly (carefully routing the wire harness out the center hole) and mounting the new folding motor assembly on your existing mirror mount. Then reverse the step above the mount your existing shell onto the new folding motor assembly.
That's about it! In the future, I might try to do these in a PDF since it makes doing inline pics and markup (arrows, circles, etc.) easier. In fact, don't be surprised if I do just that and post it below... :thumb:
Total time (for me at least) was about 1 hour (I'm a detail oriented person, so speed isn't my strong suit). Mechanical knowledge needed was pretty average and basic hand tools and a socket set was all that was needed.
Enjoy!


")