

Well, this story begins when my 2010 Enclave began blowing ONLY very hot air on the passenger side of the dual climate. Before I could even get to the dealer, the driver's side also started blowing hot air ONLY. I took it to them, and they recalibrated the temperature actuators and told me that, more than likely, once they start acting up, they will have to be replaced. We got the A/C back for about two days, then back to the hot air. The quote from the dealer for the 2 actuators and labor was around $600.
I decided to do some forum surfing and see others' experiences. I found the actuators online for ~$45 per actuator and spent a few hours getting the HVAC working normally again. I could troubleshoot which actuators were causing the problem by changing the various HVAC controls and seeing which actuators moved in response. I discovered both my Passenger and Driver side Temperature actuators were not moving to a colder temperature demand. Once removed, I took the actuators apart and found that the motors would only travel in one direction (in my case, full hot).
Below is an explanation of how to change out actuators for the Enclave HVAC. Tools I used included needle-nose pliers, T20 Torx Bit for the mounting screws of the actuators, flashlights, and various screwdriver extensions/accessories.
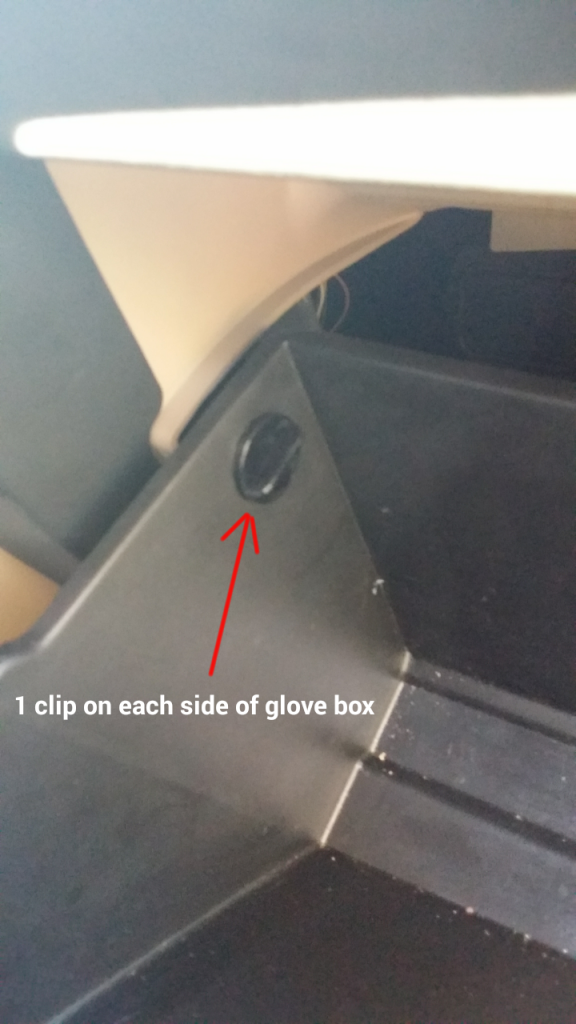
To access the Passenger side Temperature actuator, the glovebox has to be pulled out. This is done by unlocking 2 tabs, pulling out the linkage for lowering and pulling the glovebox up off the hinges.
The cover must be removed from the blower underneath the glovebox. 2 simple push-tab fasteners, and the panel is free to be pulled out. I also removed the passenger side panel of the center console for a little extra room.

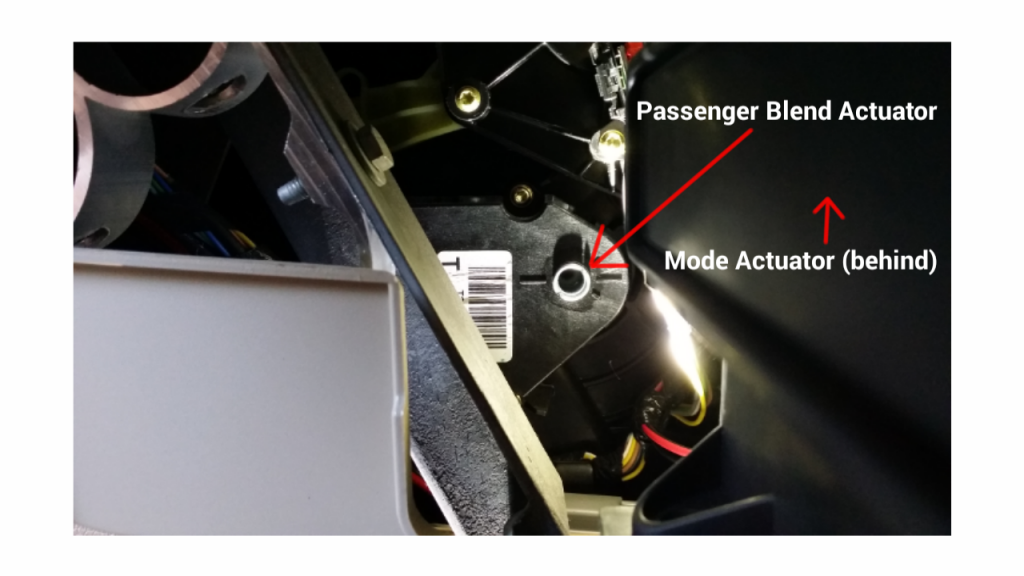
The Enclave has 4 actuators, 3 accessed from the passenger side and 1 accessed from the driver side. The Mode actuator (defrost, vent, mix, etc.), Recirc actuator (inside or outside air), and Passenger Temperature actuator (passenger air temp) are found on the passenger side.

Unfortunately for me, the Passenger Temperature actuator was the hardest to access. Small hands are a definite advantage that I did not have. I was able to get to one screw pretty easily and a second screw with a little bit of angle (be careful not to strip out the screw head). The 3rd screw was on the side of the center console, with the framework and plastic pieces in the way. I had to hold a T20 Torx bit in the screw with my thumb and back the screw all the way out using needle-nose pliers about 1/8 of a turn at a time. Once the screws are removed, unplug the wire connector from the removed actuator, plug in the new actuator, and line up the HVAC damper door with whatever position the new actuator is in. Since the actuator won't have power, you will have to position the damper door to line up with tabs on the actuator for proper installation. (do not energize the actuator before installation or it may go beyond its travel limit)
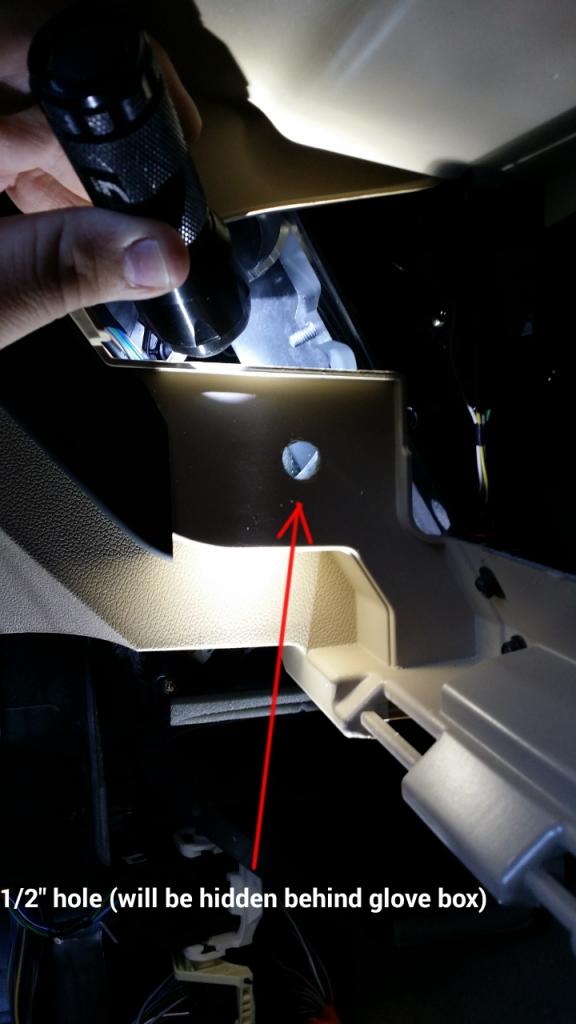
After looking at it for a while and dreading having to put the hard-to-reach 3rd screw back in, I came up with a simple solution. I drilled a 1/2" hole in the panel to the left of the glovebox that allowed a screwdriver the perfect alignment to tighten the 3rd screw. This hole will be hidden once the glovebox is installed again. I would highly recommend drilling this hole to remove the 3rd screw. It would have saved me at least 30 minutes of fighting to remove a single screw.
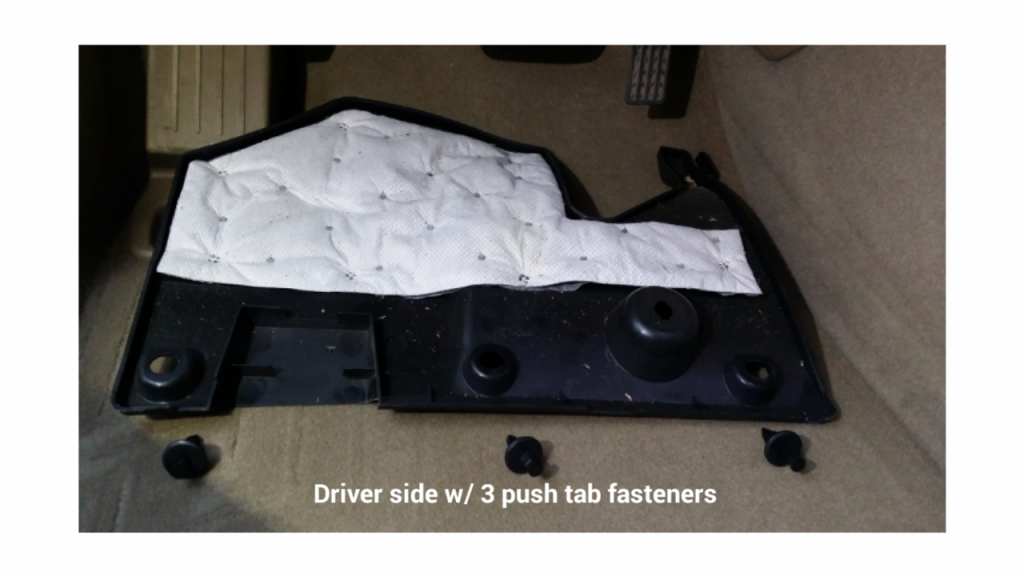
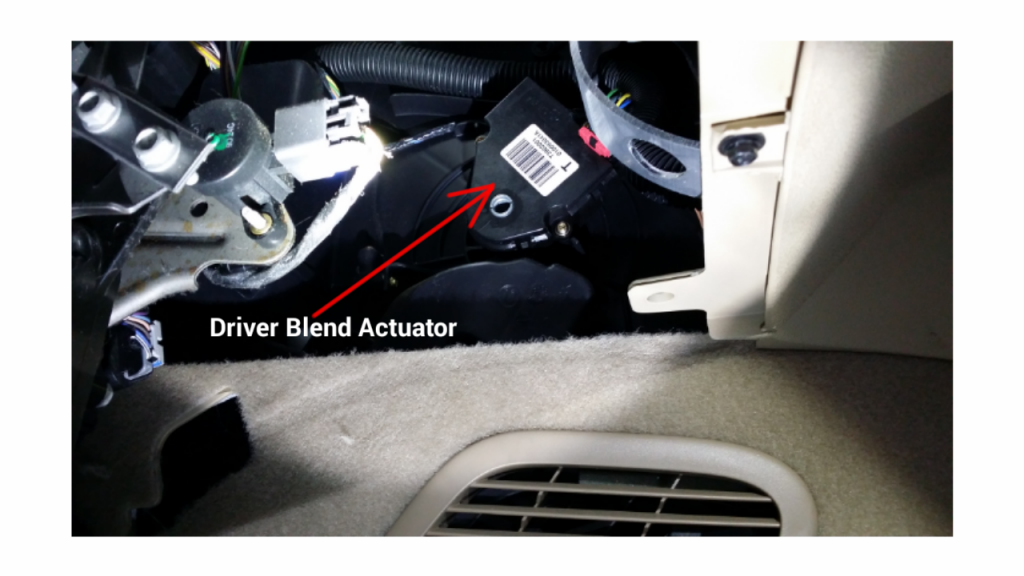
The Driver Temperature actuator is the only one accessed from the driver's side. The lower panel was removed by removing the 3 push-tab fasteners.
The driver's side seemed like a walk in the park compared to the passenger's. There was a LOT more room to access the mounting screws. This side took about 5 minutes.
Once the actuators were installed, I was able to get cool air again. However, the temperature seemed to be cycling from hot to cool occasionally. Upon further online research, I found a possible solution. It was recommended to 1) remove the HVAC fuse for a minimum of 10 seconds, 2) install the fuse, 3) start the vehicle and wait 40 seconds for the control module to self-calibrate. This fuse is found in the instrument panel fuse block, located under the instrument panel on the vehicle's passenger side (below/behind the glovebox). This would be ideal for accessing and resetting before re-installing all the panels and glovebox. This reset procedure ultimately got rid of the temperature swings. According to the Enclave Service Manual I found on this forum, once the new actuators are installed, they are supposed to be recalibrated. I didn't find any further details on what it takes to recalibrate, but I was getting my desired air temperature control after pulling the HVAC fuse and re-installing.
I hope this post is a help to those having any control issues with the front HVAC system. The procedure would be identical, just a different actuator, if your HVAC won't change from defrost to vent to floor OR from recirc inside air to normal outside air. Hopefully, this will give somebody the courage to attempt this repair for themselves and spend maybe $100 instead the $600 the dealer was projecting. Happy Repairing!
I decided to do some forum surfing and see others' experiences. I found the actuators online for ~$45 per actuator and spent a few hours getting the HVAC working normally again. I could troubleshoot which actuators were causing the problem by changing the various HVAC controls and seeing which actuators moved in response. I discovered both my Passenger and Driver side Temperature actuators were not moving to a colder temperature demand. Once removed, I took the actuators apart and found that the motors would only travel in one direction (in my case, full hot).
Below is an explanation of how to change out actuators for the Enclave HVAC. Tools I used included needle-nose pliers, T20 Torx Bit for the mounting screws of the actuators, flashlights, and various screwdriver extensions/accessories.
To access the Passenger side Temperature actuator, the glovebox has to be pulled out. This is done by unlocking 2 tabs, pulling out the linkage for lowering and pulling the glovebox up off the hinges.

The cover must be removed from the blower underneath the glovebox. 2 simple push-tab fasteners, and the panel is free to be pulled out. I also removed the passenger side panel of the center console for a little extra room.

The Enclave has 4 actuators, 3 accessed from the passenger side and 1 accessed from the driver side. The Mode actuator (defrost, vent, mix, etc.), Recirc actuator (inside or outside air), and Passenger Temperature actuator (passenger air temp) are found on the passenger side.

Unfortunately for me, the Passenger Temperature actuator was the hardest to access. Small hands are a definite advantage that I did not have. I was able to get to one screw pretty easily and a second screw with a little bit of angle (be careful not to strip out the screw head). The 3rd screw was on the side of the center console, with the framework and plastic pieces in the way. I had to hold a T20 Torx bit in the screw with my thumb and back the screw all the way out using needle-nose pliers about 1/8 of a turn at a time. Once the screws are removed, unplug the wire connector from the removed actuator, plug in the new actuator, and line up the HVAC damper door with whatever position the new actuator is in. Since the actuator won't have power, you will have to position the damper door to line up with tabs on the actuator for proper installation. (do not energize the actuator before installation or it may go beyond its travel limit)

After looking at it for a while and dreading having to put the hard-to-reach 3rd screw back in, I came up with a simple solution. I drilled a 1/2" hole in the panel to the left of the glovebox that allowed a screwdriver the perfect alignment to tighten the 3rd screw. This hole will be hidden once the glovebox is installed again. I would highly recommend drilling this hole to remove the 3rd screw. It would have saved me at least 30 minutes of fighting to remove a single screw.

The Driver Temperature actuator is the only one accessed from the driver's side. The lower panel was removed by removing the 3 push-tab fasteners.

The driver's side seemed like a walk in the park compared to the passenger's. There was a LOT more room to access the mounting screws. This side took about 5 minutes.

Once the actuators were installed, I was able to get cool air again. However, the temperature seemed to be cycling from hot to cool occasionally. Upon further online research, I found a possible solution. It was recommended to 1) remove the HVAC fuse for a minimum of 10 seconds, 2) install the fuse, 3) start the vehicle and wait 40 seconds for the control module to self-calibrate. This fuse is found in the instrument panel fuse block, located under the instrument panel on the vehicle's passenger side (below/behind the glovebox). This would be ideal for accessing and resetting before re-installing all the panels and glovebox. This reset procedure ultimately got rid of the temperature swings. According to the Enclave Service Manual I found on this forum, once the new actuators are installed, they are supposed to be recalibrated. I didn't find any further details on what it takes to recalibrate, but I was getting my desired air temperature control after pulling the HVAC fuse and re-installing.
I hope this post is a help to those having any control issues with the front HVAC system. The procedure would be identical, just a different actuator, if your HVAC won't change from defrost to vent to floor OR from recirc inside air to normal outside air. Hopefully, this will give somebody the courage to attempt this repair for themselves and spend maybe $100 instead the $600 the dealer was projecting. Happy Repairing!